
TECHNICAL SPECIFICATIONS
The aim of this part of the project, is to solve the initial problems and get the objectives achieved by specifications, so hereafter you can learn about them.
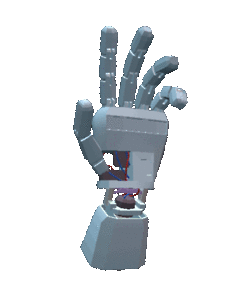
MECHANICS
This project doesn't have an extensive part of mechanics. The mechanical part of this project consists in the assembling of the power glove and the design of the structure case for the MPU and the Arduino microcontroller.
For the creation of the strucutre cases design we have chosen 3D printing due to it's the most reachable way that we had at the startings of the project and also reasons as easy prototyping, cost reduction, personalization, sustainability and Functionality.
We also had to do researching of which could be the best material for the structure, and we found two possible materials: TPU and PLA.
Although TPU had better and higher biocompatibility than PLA, we opted for PLA because the biocompatibility required in this project it’s of low degree. Furthermore, the PLA is much cheaper (the TPU costs at least twice) and we have it available in the University of Vic.
In addition, finally we assembled the structure case to the glove, and we hadn’t need the belt that we supposed we were going to use so the biocompatibilty wasn't as much as important we thought in the beginnings of the project.
If you want to know more specific detail of the 3D printing and the materials we have chosen, you can download a document in the following link where it's more specified:


BLUEPRINTS


ELECTRONICS
Microcontroller: Arduino Nano
The chosen microcontroller to operate the device is the ATmega328, with the Arduino Nano board (Rev3). This microcontroller has a flash memory of 32kb and a clock speed of 16MHz. This device is better than other ones because of its small and compact size, the eight analogic inputs and the breadboard pins encapsulated. The device has 5V and 3V3 supply outputs to power our sensors.


Finger flexion: SEN-08606 and SEN-10264 Bend Sensors
The bend or flex sensors will read the fingers bending to decode the position of each one separately. To achieve this, we have chosen longitudinal flex sensors to capture the two degrees of freedom that have the finger phalanges. We omitted the last phalange of the fingers. The chosen sensors are: 3x SEN-08606 for the index, middle and ring fingers, and 2x SEN-10264 for the thumb and little fingers.

The sensor must be connected to an analogic pin of the microcontroller with a voltage divider structure with another resistance, to deliver an interpretable amount of voltage, as it's shown in the previous image. In the specific case of our design, the resistor will be the R1 and the flex sensor is going to replace R2. This structure will return an increasing value of positive voltage as we flex the sensor.


Motion capture: MPU-9250
The proposal of our device is to capture the movements of the hand and its fingers. To capture the movement and oscillation of the hand we need to control at least six degrees of freedom, three of the movement and three of rotation. For this reason, we have chosen the MPU-9250 module, which can capture up to nine degrees of freedom, with an accelerometer, a gyroscope and a compass.

With this device, we will be able to control movement and angular acceleration. The module includes an integrated 16-bit ACD and a low-pass filter. The supply voltage ranges between 2.4 and 3.6 volts, and the device consumes up to less than 50µA, so the 3V3 input from our board must be enough to ensure its correct functionality. The communication between this module and the microcontroller is done through the I2C protocol. We have chosen this protocol rather than SPI due to its simplicity, so we only need SDA and SCL wires to communicate the module.

ELECTRONIC SCHEMES


PROGRAMMING
The programming is the most elaborated part of the project. A simple brief of the way of working would be the next:
The data is received in analog form from the electrical circuit and the motion capture is processed through the program made in Arduino. Subsequently, these data are processed with the program compiled in python, and finally an interface is designed to display the results sent by the glove on the screen interface.

If you want to know all the programming technical specifications, we recommend you to download the following pdf with a more specific documentation.
ARDUINO (C++)
Download the code:
PYTHON - DATABASE
Download the code:
PYTHON - INTERFACE
