
PROTOTYPE
MECHANICS
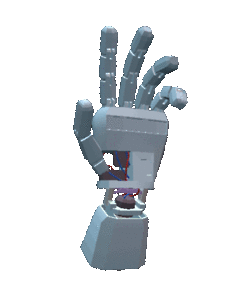
After some days thinking about the mechanical prototype and important issues such as:
the way of holding, the ergonomics, the biocompatibility, the size and the weight, etc.
We did a first 3D print of the desing, and hereafter you can observe it.
After this first design, we saw appropriately to do some changes on it because this one was too big and too weighted. Neither the ergonomics were good.
On your right, you can see the initial and the final design.
Also, in the following downloadable document you will be able to read all the new changes we made printing after printing.


ELECTRONICS
We needed to implement a first testing prototype to test the functionality of the device, so we have implemented two first circuits to start working in parallel with the programming code. The first draw represents the circuit that will test the caption of the flex sensors, which resistors doesn’t match with the schematic ones, because for that time we didn’t already had the final bend sensors, se by that time we were using other ones that the university had brought to us, to start testing.
TESTING DEVICES


After that two first circuits and couple tests completed, we joined the electronic into a scheme like the final prototype. This prototype includes the five flex sensors and the MPU module connected to the Arduino device. With this one, we have been able to test the final functionality of the Arduino and send the data of all the sensors correctly.
PRELIMINARY DESIGN

At this point, we have correctly compared the theorical data with the reality. We also have started to think about building a power glove device in order to tune the results and improve the accuracy of the system. We must implement a compact circuit with a sheet of PCB to have an ergonomic prototype.
FINAL PROTOTYPE
Before building the final PCB circuit, we first made a draw of it using Inkscape. In the image we can see the voltage dividers and the final outputs spawning in the bottom of the PCB. The red and black are welded pins, and the green are wires.
It seems compact, but the flying circuits do bother us a bit, so we tried another setting, rotating the Arduino device. With this one, we don’t need any wire in the process, as we can see in the image below.
DRAWINGS AND CHANGES


FINAL PCB PROTOTYPE

FINAL PROTOTYPE
